The komera.
4 out of every 10 children in Rwanda suffer from chronic malnutrition. 1 out of every 10 children will die before the age of five. This problem is entirely solvable.
In the US, people get their vitamins from fortified cereals and salt, which has been shown to be the most cost-effective and compliant method to deliver vitamins to people. In Rwanda, however, most people cannot afford processed foods. They grow cassava and take it to the miller to be ground into flour. We have found a way to bring the benefits of fortification to the small-scale miller.
The Komera, named after the Kinyarwanda word meaning “be strong”, is a low-cost mixer that attaches to existing small-scale mills and allows millers to easily and evenly mix fortificant into the grains they process. The device adds only about two minutes of extra effort by the miller. Most importantly, the device will be sold for $35 and its implementation can be entirely market-driven.
This was a project created at the Stanford D.School when I was a student, alongside one of the best teams I’ve ever worked with.
Market need.
Rwanda is one of Africa’s most densely populated countries. Its current total population is 8.1 million with 305 inhabitants occupying each square kilometer. The fertility rate is high and the population has been increasing at an annual rate of about 2.8%, expected to reach 12 million by the year 2012.
The population density has always put tremendous economic and political pressure on the country and, historically, it can be considered one of many complex root factors that led to the genocide in 1994. Today in Rwanda, people are trying to rebuild all parts of their lives. Over the last ten years many important measures have been taken. Since 1994, the economy has grown on average 8% per year. However, in spite of this progress, the country still faces enormous challenges, most of which are inherently linked to poverty. Many communities in Rwanda live with chronic food insecurity and, at times, famine.
More than 60% of the population of the country lives in rural areas. The majority of rural villagers are subsistence farmers who grow their own cereal grains, such as cassava or maize. Their diet primarily consists of these cereals and lacks diversity in terms of fruits and vegetables. These cereal grains, post milling, lack essential vitamins and minerals. Malnutrition is broadly defined as a medical condition caused by an improper or insufficient diet. Rwanda is suffering from deep malnutrition.
According to the World Health Organization (WHO), severe acute malnutrition remains a major killer of children under five years of age in Rwanda. Iron deficiency is not only the leading cause of death during childbirth, but also impacts a person's energy level leading to a 17% reduction in work capacity. It is severely affecting life expectancy, which stands at 46 years for both sexes.
We learned that Rwandans need an efficient, cost effective way to get nutrition in their diet.
Our Users – Observations and Insights
In order to tackle the complex problem of providing nutrition, it was imperative to understand the cultural and physical environment of our user. Two of our team mates traveled to Rwanda in March 2009 to connect with our user – to learn more about the lives of rural Rwandans, their families and their eating habits. Below is an overview of some of the key observations and insights we gained about our user. These particular observations and insights influenced the design of our device.
Dependence on Cassava
Most Rwandans depend on Cassava, a woody shrub that is extensively cultivated as an annual crop for its edible starchy tuberous root. Because of its massive leaf production which drops to form organic matter thus recycling soil nutrients, cassava requires little or no fertilization and yet will maintain a steady production trend over a fairly long period of time in a continuous farming system. It is an annual crop that grows just about anywhere and in any season.
Cassava is to the African peasant farmers what rice is to the Asian farmers, or what wheat and potato are to the European farmers.
It is not recommended to eat cassava uncooked, because of potentially toxic concentrations of cyanogenic glucosides. In order to get rid of this cyanide, Rwandans go through a long process convert the tuber root into flour. Based on our discussion with farmers and millers, the process can be broken down into the following steps:
Pull Cassava from the ground
Peel the skin quickly within 24 hours
Soak in water for 2-3 days (there was some variation)
Squeeze water out by putting Cassava in bags and pressing hard
Dry out in the sun for 2-3 days
Dry under a roof for 1 day
Grind it at a miller to retrieve flour (explained in detail below) OR grind it at home using a mortar and pestle.
A large majority of rural Rwandans eat Ugali, prepared by boiling Cassava flour in water. Their dependence on Ugali for most meals was extremely high – in many cases being their only meal, along with beans and bananas. Doing deep-dive interviews with farmers led us to the realization that they actually really liked Ugali, and considered it as one of their favorite food items. Unfortunately, the cassava flour contains very minimal nutrition, as can be seen in the nutrition chart on the right. Although it is high in calories and provides a “filled” feeling, it lacks major vitamins and mineral.

Weekly visit to the Miller
As mentioned above, after drying the Cassava in the sun for a couple days, farmers walk to the nearest miller to grind their Cassava into flour. Typically, each village home has a miller within walking distance where they would, on average, carry about 10 kg of Cassava to grind. This 10 kg of Cassava would last a week for a family of six.
The interaction with the miller was pretty standard and straightforward. Following is a protocol they followed, based on a number of interactions we observed:
Enter miller room, which is typically covered with Cassava flour
Hand Cassava bag to miller (~10 kg)
Miller empties the Cassava bag into the mill hopper and ties the bag to the output of the mill
Miller turns on the diesel-powered engine and lets the mill run until all the cassava has been ground.
Miller releases the bag, weighs it on his scale
Based on the final weight, miller charges ~15 RwF ($0.03) per kg
Farmer pays the amount and leaves
Most of the small-scale mills we saw were old, “fixed up”, dusty, but did the job quick. The whole process of milling a bag of cassava took only about 3-5 minutes. Although we saw quite a few variations of the mill in terms of the machine layout and different engines used, the input hopper and the output funnel was very similar. Based on our observations, the milling operation seemed like a very simple cassava-in and flour-out system.
We should note that there are very few things, if any, that rural Rwandans paid money for. Although some farmers preferred to mill their own cassava at home, a good part of the population visits the miller every week, and pays for the milling. There are about 800 small-scale mills in the country and each gets an average of 10 customers each day.

.
Target User profile
Meet Beatrice, a Rwandan homemaker, living in Rwinkwavu, two hours from the capital city of Kigali, Rwanda.
Her family earns less then $1/day from 600 square meter plot agriculture.
She grows mostly Bananas and Cassava.
She prepares Ugali (from Cassava) twice a day for a family of 5.
She visits the miller once every week to grind cassava.
Her youngest kid, James (on her lap) suffered from malnutrition – had to be admitted to nearby PIH hospital – putting personal finances into a disarray.
Based on our hour-long discussion, she seemed very tired and worked out – stressed about the family’s future.
As a mother, she wants to see her family, especially her young children healthy. She wants to provide them with good nutrition, but can’t afford to.
She is not used to considering choices.
She is highly risk-averse
Beatrice needs an efficient, cost-effective way to get nutrition into her family’s diet.

Opportunity
In Rwanda, the social and economic costs associated with infectious disease are greater than in any other part of the world. HIV, malaria, diarrhea, measles, blindness, and tuberculosis are collectively strangling much of the country. Proper nutrition can provide necessary immunity against such diseases. For example, it's been shown that adequate levels of vitamin A can all but eliminate preventable blindness and the risk of dying from diarrhea and malaria decrease from 21% to 13% with proper levels of zinc and vitamin A. It is now widely believed that death from HIV infection is significantly lower among patients with adequate levels of iron, vitamin A, and zinc. Folic acid, a vitamin B compound, reduces the prevalence of neural tube defects such spina bifida by over 70% and cleft lip and palate by 40% -- both requiring expensive surgical intervention to repair.
We partnered with a non-profit organization, Project Healthy Children, which works with governments and private industry to establish food fortification and supplementation programs that improve the health of women and children around the world through food fortification. We focused on food fortification as it has the greatest impact for the lowest cost. Fortification, once in place, is essentially a "stealth-health" program and does not require the population to change habits or practices - they get the benefit without even knowing it is occurring. Fortification can take place at the national level, where PHC works with local governments to design and pass food fortification laws. Zing will make it happen at the local level by working with small local millers to fortify the foods at the village level.
The cost and benefit of fortification intervention is well studied and documented. Among the most common vitamins and minerals fortified, the payback ranges from over 120:1 to 6:1. The following table shows major micronutrients, corresponding annual costs per person and benefits:

How it works.
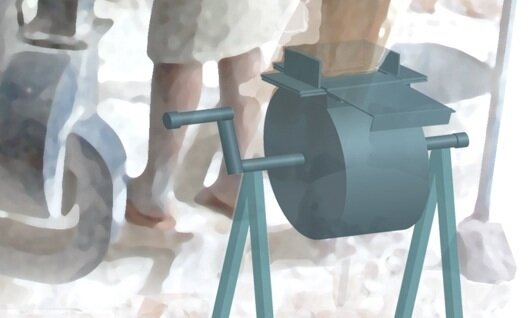
We created an add-on device that can accurately mix micronutrients into milled flours. The solution fits onto every mill, ensures uniform mixing and has minimal operating costs. A rendering of the end product is shown below, and a more detailed product explanation is provided in Design Concept section.


Product Description
The Komera has 4 main parts: Main Drum Body, Sliding Door Outlet, Stand, and Axle. Please see Appendix D for detailed dimension of each part. Note that each part is constructed from materials and by machinery we believe to be readily available in Rwanda or a nearby country such that manufacturing and repairs can be made cost-effectively.
Main Drum Body
The Main Drum Body consists of a cylindrical piece with interior fins along the circumference. The drum is to be oriented horizontally and rotated along an axis through the centers of the end cap pieces. The end cap pieces are actually made into octagonal pieces to limit the manufacturing machines required to just the jump shear. The octagonal pieces also provide extra material for ease of welding to cylindrical piece. The cylindrical part leaves a 12” by 8” opening to be connected to the Sliding Door Outlet. Fins are inserted to create more agitation during rotation for better randomization of flour particles, i.e. better mixing. The fins are also angled differently from traditional washing machine-style fins such that flour would not get caught when emptying into bag. Finally, the dimensions of the drum are chosen such that 10kg of flour (typical transaction amount) will fill about 40% of the drum volume, the upper limit for effective mixing according to industrial research. ( Kaye, Brian H. “Powder Mixing.” London : Chapman & Hall, 1997.)

Side view schematics of the drum. The blue and green blocks represent flour and fortificant. As the drum rotates, the fins help material fold onto itself to create thorough mixing.

The traditional washing machine-style orientation of fins on the left catches flour as the drum empties. The Komera has downward angled fins such that all flour falls into the bag.
Sliding Door Outlet
The Sliding Door Outlet is both the inlet and outlet for flour and serves as a sealing mechanism for the Main Drum Body. A rectangular volume rises above the drum body to create a short chute for flour to go in and out. The sliding door is a piece of sheet metal sliding in and out of a sheet metal frame. Having looked at various door mechanisms, we modeled our door after the air vents in large room vacuum systems. Compared to hinges and latches, this sliding door mechanism had the lowest space requirements, provided a tight seal, and required the smallest number of parts and lowest material costs. On top of the sliding door frame, we attached an additional short chute, which we call “shoebox,” because when the drum is turned upside down, this second chute provides the correct geometry for the miller to attach the bag. In this way, the sliding door can be pulled out when the drum is upside down to let the flour empty into the bag by gravity.
Stand
The Stand consists of two triangular frames connected by cross bars for stability. To minimize parts, steel pipes are chosen as both the securing part as well as the bearing for the axle. The inner diameter of these pipes match the outer diameter of the axle to provide a snug fit such that the drum will not move around during rotation. The fit is not too tight and the axle can slide freely. Over time, when there are flour particles present and there is slight wear on the axle and the bearing, the rotation will become even smoother. Note that we require the drum to be rotating at a relatively slow speed – approximately 15-20 rpm – so there will not be significant friction or heat generated at the bearing, enable this material choice. One of the 3 cross bars is angled to provide lateral stability.
Axle
To minimize part count, the axle is made entirely from one steel pipe. Approximately 2” space is left on either side between the collar on the Main Drum Body and the Collar Bearings on the Stand to avoid friction between surfaces. The length of the crank is limited to 8” with the machinery available to us but ideally it should be at a length comfortable to the miller. In testing with our own team members of similar size as local millers, the optimal length was 6”.
Testing
Testing was done by first determining the tolerances to determine how mixed the flour needed to be and then testing to those tolerances.

Data for calculating the mixing tolerance we can operate with. Date source: Micronutrient Initiative Fort Handbook (Fortitech).
From the data above, we realized that if one quarter of the iron we put into our drum ends up in 1/10 of the space, we have reached the upper limit of how much iron a person can eat. The 18 mg is the upper limit of RDA standards, and often only 8mg of iron is added into the premix. Thus, were confident that this was the tolerance to aim for.
We chose iron as the basis of our testing because we were sure it would be included in our pre-mix, as iron deficiency is the world’s largest micronutrient deficiency. However, as can be seen below, the iron ratio is in line with other upper limits.
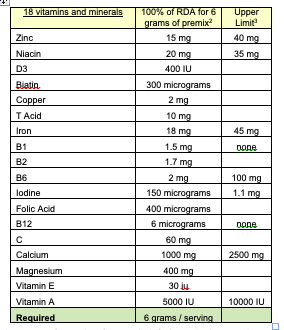
Essential micronutrient amounts for premix and at upper limit for human intake per serving
We tested our samples visually, using a blue power chalk and white flour. After each spin, we sampled from the center, back left, middle top and back right. We compared ‘spec’ counts and made sure that no sample had a concentration of the powder entered. For instance if we added one tablespoon of blue powder (8 grams) to a 10 kg, 8 out of every 10,000 particles should be blue. If 25% (2 grams) ended up in 1/10 the space (1 kg), 20 out of every 10,000 particles would be blue in our sample.
Typically, as we needed more powder to visually see the blue powder, we would compare samples and ensure they had the same number of particles. If one sample had 2.5X more than another sample, we reached our upper limit.
While we believe we met these tolerances, we also admit these were done by visual inspection. As part of our next steps, we would like to take our samples to a chemistry lab and have them do more concrete tests.
Manufacturing Strategy
We have not yet selected a partner to manufacture our product. We see two distinct strategies for how to select a partner. First, we can select a machine shop in Rwanda. Second, we can product in a low-cost manfuacuting hub (such as China) and ship the products to Rwanda. While further information will be needed to make a final decision, we are hopeful that the current design can be made in Rwanda. Because only 800 units are needed, because there is no high-tech process necessary (mostly the unit requires bending and welding), and since we are unclear on the tariff landscape, we believe this is the first option to examine in detail.
Presented below are initial plans and manufacturing estimates that are our best estimates on the process and cost to produce our product.
The construction process for each of the 4 main parts of the Komera is detailed below.
Main Drum Body
o Drum cylinder: Start with 20-gauge sheet steel measuring 12” by 48” to be rolled in standard sheet roller into 10-in radius cylinder shape with 8-in opening gap between long edges
o Fins: Use jump shear to create three 3” by 12” rectangles. Use angle bender to bend one 1” by 12” to 90 degrees for one and to 45 degrees for the rest. Align fins in interior of the drum cylinder with about 120 degrees between one another. Take care to make sure the 45-degree bend fins both tilt downward when the outlet is pointing down. Drill #10 holes about one inch from either end from outside the cylinder through both cylinder and fin and apply rivets.
o End cap pieces: Trace out 10-in circle plus intersecting 8” by 3.5” rectangular outlet (see drawing for details) on 16-gauge sheet metal roughly 25” by 30”, trace out encompassing octagon and cut off corners on jump shear. Mark center of each piece and use mill to drill out 1” diameter hold. Bend 8” by 1.5” piece to 90 degrees on the angle bender to create overhang ledge away from center of drum. Repeat to create the other end cap piece. Use MIG welding to join end cap pieces to drum cylinder
o Outlet walls: Use jump shear to create two 12” by 3.5” rectangles. Bend 12” by 1.5” piece to 90 degrees on angle bender to create overhang ledges away from center of drum. MIG weld to drum cylinder and end cap pieces to create rectangular outlet.
o Collars: Take two 2” by 1” inner diameter, 1.25” outer diameter steel pipe, drill 0.25” diameter holes through the side along the diameter on the drill press. MIG weld one to each end cap piece around the center hold outside the drum volume.
Sliding Door Outlet
o Filler pieces: Use jump shear to create two 0.75” by 10.25” rectangles and one 0.75” by 15” rectangle.
o Frame: Use jump shear to create two 15” by 1.5” rectangles and two 8” by 1.5” rectangles. With filler pieces lined on top of the drum ledges at the outlet around the outside perimeter, place frame on top and MIG weld to tack along the outside.
o Door: Use jump shear to create 9” x 15” rectangle, use angle bender to bend 15” by 1” piece 90 degrees in the downward direction. Slide door into the crevice created by filler pieces between frame and drum ledges.
o “Shoebox:” Use jump shear to create two 12” by 3” rectangles and two 8” by 3” rectangles. Use angle bender to bend 1” ledge on each piece on the widths to create 4 L-shaped pieces in their original lengths (12” and 8”). Use oxyacetylene welding to tag-weld 1” ledges on top of the sliding door frame to create a 12” by 8” opening above the sliding door.
Stand
o Triangular frames: Take two pieces of 96” length 0.5” by 0.5” square steel tubes. Cut each into 40”, 40”, and 16” lengths with the 40” lengths cut at 80 degrees. Form isosceles triangular stand with each set with 16” length piece on the ground. Use oxyacetylene welding to weld together pieces. On one side of the whole stand, drill two holes on the drill press, one on each triangular frame at different heights from the ground to form holes to secure angled cross bar with bolts. On each of 4 angled legs, drill 0.25” hole near the ground on the drill press to form holes to secure 2 level cross bars with bolts.
o Collar bearings: Take 1” inner diameter, 1.25” outer diameter by 4” length steel piping and weld to triangular stand piece such that the pipe opening is parallel to the plane of the triangle.
o Cross bars: Take two pieces of 2” by 24” by 0.25” flat plate and weld to midpoint to each triangle as cross beams in the stand.
Axle
Slide axle through drum collars to identity points to drill 0.25” diameter hole. Drill these holes on drill press. 34” away from one end of the axle, bend 90 degrees using tube bending then another 8” along the axel create an opposite 90-degree bend. Slide axle through and align holes with holes in collar, screw in 2” bolts and nuts with washers.
Final Assembly
Slide axle into piping welded to stand. Place 6” PVC pipe around the bent end of the axel and weld square steel 16-gauge piece at the end of the
Unit Economics
Manufacturing Costs
There are both one-time capital costs (tooling) and variable costs (labor and materials) that must be addressed to manufacture our product.
In terms of capital costs, the following are tooling needed to manufacture our product:
Jump shear capable of shearing 20-gauge steel
Sheet metal roller capable of rolling 20-gauge steel
Sheet metal angle bender capable of bending 20-gauge steel
Hand drill with #10 drill bit for riveting
Riveting gun and rivets
MIG welding kit
Oxyacetylene welding kit
Rotary cold saw
Metal tube bender capable of bending 1” O.D. 0.125” wall thickness steel tube
Drill press with 0.25” drill bit
We assume that our manufacturing partner or external donor will cover all tooling costs. This assumption is based on looking at past examples of partnerships to product products in developing markets. Dama, for instance, has typically covered tooling costs for its product. In addition, interviews with PHC have made us believe that raising it is highly likely that we can raise money to cover these one-time costs. To be very clear, these costs are not included in the company financials.
In terms of variable costs, both labor and material costs are built into the income statement. A more detailed description of COGS is included below:

Detailed breakdown of cost of goods sold.
In terms of materials, steel costs were estimated using current commodity steel pricing ($0.33/lb). A sensitivity analysis is provided in Table 12, as it is the key driver of costs. Steel price increases can significantly increase the manufacturing cost of the Komera under its current specifications, and will make it more imperative to explore alternative materials. It is believed that the rubber band and axle will be part of a pre-assembly and thus not be produced in house, but it is unclear whether these items will be charged a tariff at this time.
Labor rates were based on research from Rwanda Works, and are based on a $2/day salary. This rate has been pro-rated to the labor intensity of each task, with intensity being determined by the teams’ experience with the product.
Miller Profits
In order to be a successful product, millers must adopt the Komera. We believe we can generate a $40 annual profit for a miller who typical makes around $700 a year. These profits are contingent on the fact that families are willing to pay a premium for fortified flour. We believe this is a reasonable assumption. First, a similar program has shown that in Nepal people are willing to a pay a $.005/kg premium for fortified flour. This is approximately a 3% increase over the amount usually paid for non-fortified flour. More importantly, the Nepal experience demonstrates that customers are willing to pay extra for fortified foods.
We believe that Rwanda can also support a $.005/kg premium. First, while this would equate to a 20% increase in prices charged for non-fortified flour, there is already a market for good (e.g., whiter and more vinegar-smelling) cassava flour. Premiums for ‘good’ cassava are often 20%, and it is not only the rich who pay for this food. Second, our calculations show that this price would equate to approximately $1.25/year in additional expense for a family of five. Compared to a baseline income of $365 a year (i.e., a family that earns $1 / day), and our interview experiences of people paying for health when sick, we believe the market can support this premium.
Based on this premium, we believe the miller can make a profit of over $40 per year in perpetuity for the lifetime of the product. Because the product costs $35, this is an 11-month payback for the miller.
Detailed Description of Model
According to PHC, cassava flour can be taken to a local mill to be ground for 20-40 RwF per kg. From our team’s conversations with small-scale millers, the millers are charging approximately 15 RwF per kilogram, or $0.03, to mill the cassava into flour. We have used the latter estimate in our profitability model since it is more conservative.
Data from a consumption survey conducted by PHC indicates that 5% of individuals who purchase cassava flour do so from a miller. However, the team has noted that many families sometimes visit the miller and other times visit the market or shop. Since it is not clear where these individuals are accounted for in the data, the number of families visiting a miller may be up to 25%. Therefore, taking into account Rwanda’s rural population of approximately 7 million and average family size of 5 individuals, between 70,000 and 350,000 families may be served by small-scale millers. This translates to a range of between six and thirty visitors per day for each of the small-scale millers, assuming that each family visits once every two weeks. From the field conversations that our team had, the anecdotal data suggests that a miller may receive 10 customers per day, each of which requests 10kg of flour, and this is what we have assumed in our model in the initial years. In the later years, as people come to demand fortified flour, the number of visitors per day increases slightly to twelve.
We have assumed that the miller’s cost structure also shifts as a result of implementing our device. First, the miller must pay upfront for the fortificant that will be added to the flour, as well as the distribution costs associated with delivering the fortificant to his mill. We show in detail the break down for the distribution costs below. We estimated the cost per shipping based on UPS numbers, although we believe we can find a cheaper shipper. As is described in more detail in the Distribution section, we plan on delivering fortificant from South Africa.
The miller may also face some incremental labor and maintenance costs as a result of our device, but they are negligible because the workers have idle time and should not be paid additional wages as a result of fortification. Furthermore, we have designed our device such that the incremental time spent and the maintenance requirements should be minimal.
As the model shows, a miller can earn $38-48 in incremental profit annually from fortification. Our current price point of $35 would earn the small-scale miller a return of 110% over five years and a steady cash flow. The payback period on his initial costs would be approximately 11 months.Therefore, our solution would be financially attractive from a miller’s standpoint at this price point, though through conversations with PHC we believe that the upfront cost of the device could be subsidized and not borne by the miller.

5-year financial projects for miller who purchases a Komera mixer.


